We have another special free Zoom workshop scheduled to help alleviate any winter blues, thanks to donations from members and ArtsWestchester.
This workshop is free, open to all NSQG members, and will NOT be recorded.
Saturday, January 30th, 10am-1pm, Mary Cannizzaro will be teaching how to make T-shirt quilts from her book, Beyond the Tee, co-authored with her daughter, Jen.
Sooner or later, every quilter gets a request for a T-shirt quilt.
If you haven’t made one yet, be prepared and learn the techniques.
If you’ve already made one, learn some new ideas for the next one.
We will be sending out the zoom link a day or so before to all members.
Formal registration not necessary, but to have some idea of how many will participate, please email Linda at programs@northernstarquilters.com if you are likely to attend.
Beyond the Tee – Mary Cannizzaro
This workshop will be out of the ordinary. Usually when you sign up for a workshop, you receive a supply list for fabrics and supplies according to the pattern and design. In t-shirt quilts, your materials will vary depending on the motif’s size and shape, the number of shirts, the variety of subjects and colors of the motifs. See what I mean? Not your ordinary workshop. My goal is to whet your appetite to jump into the t-shirt quilt possibilities. I’ll teach you the basics. A copy of the book is helpful, but not required.
I invite you to listen to our interview Podcast on National Quilters Circle. Here’s the link.
https://nationalquilterscircle.podbean.com/e/interview-with-mary-jen-cannizzaro/
The workshop will cover 3 areas:
- A glimpse into the process of taking your t-shirt quilt to the next level. We have all seen and probably made those quilts using squares cut from the t-shirt motif surrounded by sashing and sewn together in rows and columns. Jen and I have attempted to elevate the lowly t-shirt quilt to a higher status. We make quilts that happen to use t-shirts. I will show blocks and layouts to make this possible.
- Fileting your tee shirts. If you have ever fileted a fish, you know exactly what we mean. Every part can be an important and I’ll show you how to decide and execute.
- In class, you will learn how to design a diamond block. You will be able to draft any size that is needed for your motifs. We will use basic supplies.
Further classes available
- One on one design class
- Layout possibilities
Supply List

Materials
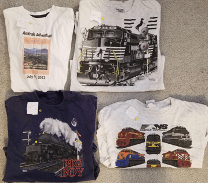
- T-shirts that you might consider for a quilt but will not be cut in class. These will be used for discussion only. A variety of different size motifs would be helpful, but not required. Fold your shirts as in the photo below and have nearby during class. Measure each motif and pin a note with the size to each. Again, helpful, but not required.
- T-shirts to cut up. They can have motif or not. We will use them to learn how to filet. Minimum is two, but the more the better.
- Stabilizer of some kind. I use Pattern Ease, a non-woven stabilizer normally used to trace garment patterns. In class, it can be any light-weight interfacing or the stabilizer you use for embroidery. You will need to be able to see the motif through it. Size approximately 20’’ square, but don’t cut, just have ready.
- Iron-on interfacing. We recommend Stability or Pellon midweight. For the class, any iron-on will be ok. You just need to get the idea of how it will all work. Approximately 1 yard, but don’t cut, just have ready.
Tools
- Paper and pencil. Any paper (no lines) will do, this is just for drafting. A few pieces, at least legal size.
- 6” x 24” ruler with 60-degree lines.
- Cutting mat and rotary cutter.
- Iron and ironing surface.
Optional, but nice to have.
- Drafting ruler 2” x 18”
- Cutting mat with 60-degree lines.
- 60-degree ruler. I will also demo how to make the diamond with this ruler.


